Usage
Connect a usb camera to PC, then start GUI by executing usbcamGUI/usbcamGUI.py as below.
python usbcamGUI.py
The frame read from the connected camera is shown in the view area of the window. User can save image, change the camera’s paramters by pushing buttons or keyboard shortcut.
Save frame
Press the Save button on the top or Ctrl + s to save frame displayed on the window. The image is saved as png and the suffix can be changed by -p <suffix> option (for example, python usbcamGUI -p jpg). The following suffixes will be acceptable.
pngjpgpgmtiff
The filename is determined by the Naming style flag. While determined automatically in Sequantial and Timestamp mode, user can choose any filename in Manual mode. Press the Naming style button or Ctrl + n to switch the next flag.
| style | example |
|---|---|
| Sequential | 00000.png |
| Timestamp | [yymmdd-HHMMSS].png |
| Manual | any |
When save the image, the csv file that contain the parameters is also made at the same time. In the file, each parameter is listed in the format: [param],[value]
Video record (experimantal)
Press the Record button on the top or Ctrl + r to start recording. To improve performance, frame in the view area doesn’t update during recording.
Change parameters
The label, slider and value on the right of the window shows each adjustable parameter supported by camera. You can drag the slider to change its value. Whether the specified parameter is valid strongly depends on what camera you use.
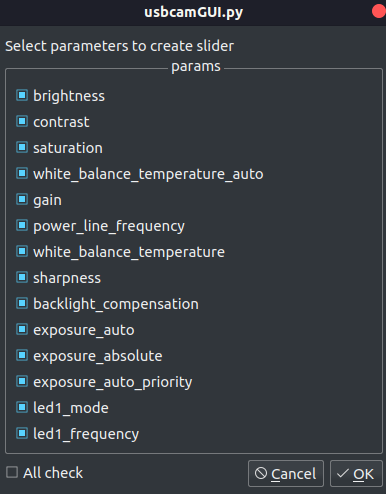
Change sliders on the window.
If you want to change the number of sliders on right of the window, Click Choose parameter sliders in View tab or Ctrl + g to see the list of parameters supported by camera. Check the items you want to set and click ok to reconstruct the layout contain the sliders of the selected parameters.
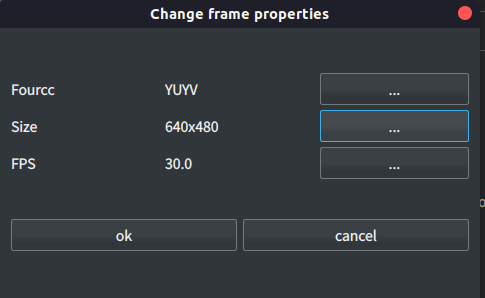
Change image size and FPS
Pressing the Properties button calls a dialog box to change image size and FPS. Select fourcc, size and fps you want to set, then click ok. The values are applied as new properties if those are valid.
Switch theme
To switch the GUI color-theme, Press Light/Dark button above the view area or ctrl + t. The dark theme is set by default. The files for setting style are quoted from Alexhuszagh/BreezeStyleSheets
Arguments
Users can execute the program with options
python usbcamGUI.py <option> <value>
The list are shown with -h option
| Option | Description | Default | example |
|---|---|---|---|
| -c | The kind of connected camera | usb_cam | -c usb_cam |
| -d | Device index of the connected camera ( /dev/video\ |
0 | -d 1 |
| --dir | A directory where the saved image and video are outputted | . (current directory) | --dir image_dir |
| -e | Extension of the image to save | png | -e pgm |
| -col | Colorspace (color or gray) | rgb | -col gray |
| -s | Show a list of width, height, fourcc and FPS supported by camera. | False | -s |
| -sa | Show a list of format supported by camera. This is output of v4l2-ctl command | False | -sa |
| -sp | Show a list of parameters supported by camera. This is output of v4l2-ctl command | False | -sp |
Note
Execute on Raspberry Pi
Executing usbcamGUI//usbcamGUI.py with -c raspi option is recommended due to the adjustment of window layout and parameters.
python usbcamGUI.py -c raspi
Execute on windows
Note that
In many case, the device number 0 is connected to the internal camera. To use usb camera connected as external device, specify the device number 1 by the following (when one camera is connected to PC).
python usbcamGUI/py -d 1
The number of adjustable parameters is set to minumum. I don’t know how to extract the camera-supported information (parameters and its min, max, step and so on) on windows machine. If anyone knows how to get that, please tell me about the information.